

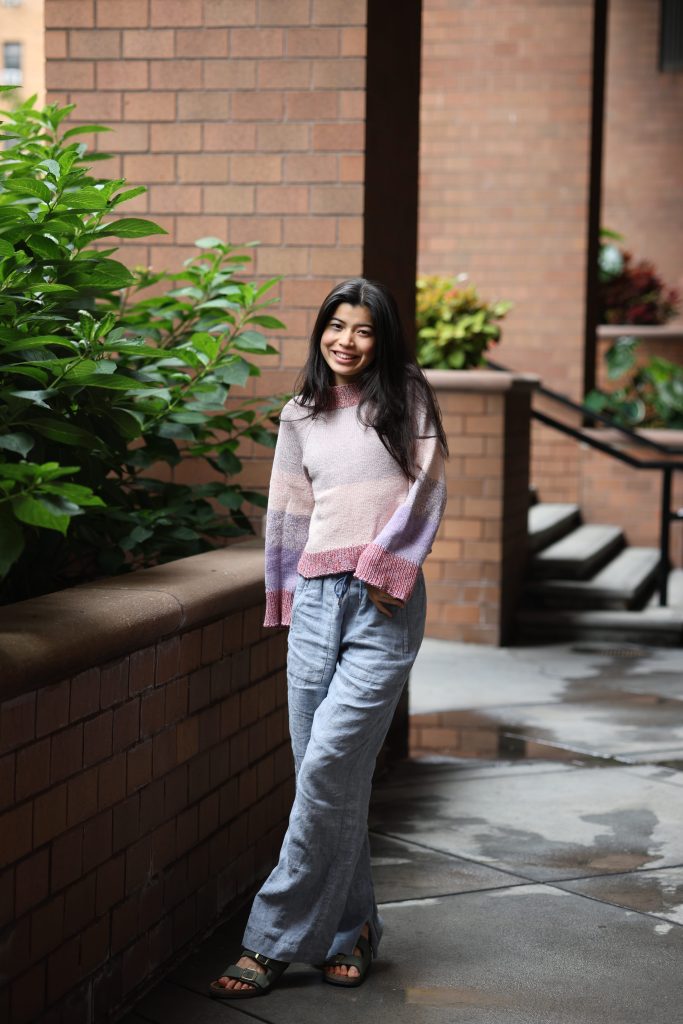
Fun colors, huge sleeves, and a squishy collar? What more could you ask for?

Introducing the Cotton Candy Sweater! This sweater is an absolute delight to knit and an absolute delight to wear. Every time I wear this out it just brightens my whole mood!
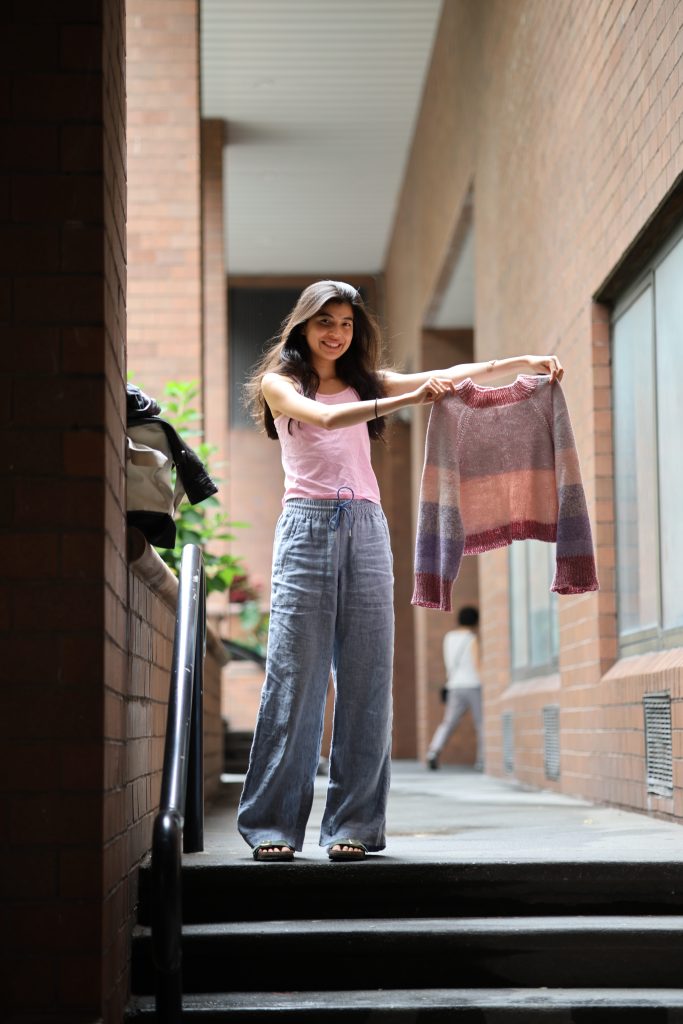
Despite the fact that this is a whole garment (and includes two very massive sleeves), I knitted this sweater up pretty quick because I kept wanting to get to the next color change. Speaking of colors — aren’t these shades of pink and purple just GORGEOUS? This is truly one of my favorite knits to date.

In this knitting pattern, I am going to give you an outline of how I made this sweater with options to lengthen each portion to fit your own body. This is a super simple, beginner friendly pattern with no complicated shaping — the simplest raglan pattern you can find!

MATERIALS:
- Yarn of any weight (I held two strands of lace weight yarn together to create a sport-DK weight yarn. The two strands were different colors, which created the subtle marling look throughout my sweater. I also made stripes). Depending on your size, you will need 1200-2000 yards.
- Circular knitting needles. The size should match that of the yarn you’re using. I used 3.5 mm needles.
NOTES:
This pattern is a raglan style, meaning that you cast on for the collar, work the ribbing, and then increase for the bust. Then, you will put sleeve stitches on hold, cast on stitches for the underarm, and work the body. Lastly, you will work the sleeves.
The notes below for the pattern are based on my size. I will include notes throughout the pattern on how to adapt it to make it more suited to your own measurements.
ABBREVIATIONS:
K = knit
P = purl
PM = place marker
SM = slip marker
M1R = make one right
M1L = make one left
PATTERN:
- Cast on 100 stitches and set unique beginning of round marker. (Note: for wider neckline, cast on more. For smaller neckline, less).
2. Work K1, P1 rib for 2 inches. (Or more or less, depending on how long you want your collar to be).
3. Now you will knit 1 round, placing markers at the points below.
K11, PM, K2, PM, K23, PM, K2, PM, K23, PM, K2, PM, K23, PM, K2, PM, K12. You should have reached the beginning of round marker again at this point.
4. Knit to next marker, M1R, SM, K2, SM, M1L. Repeat these steps until you reach beginning of round marker (do not increase at beginning of round marker).
5. Knit one round, slipping markers as you come to them.
6. Repeat rounds 4 and 5 until your yoke has reached desired depth. I would recommend trying it on over your head at this stage to see where it meets your bust. It should lay around your armpits, with a little bit of positive ease (extra room).
7. Now we will separate the body and sleeves. Knit to next marker and remove marker. K2. Remove marker.
8. Slip the next stitches (up to the next marker) onto another needle cord or a piece of scrap yarn. These are your sleeve stitches. We will work with them later.
9. Cast on 10 underarm stitches (onto the RH side of your main needle, where the body of the sweater will be knit).
10. Remove marker from LH needle if it is still there. K2. Remove marker. Knit to next marker. Remove marker. K2. Remove marker.
11. Slip the next stitches (up to the next marker) onto another needle cord or a piece of scrap yarn. These are your second sleeve stitches. We will work with them later.
12. Cast on 10 underarm stitches (onto the RH side of your main needle, where the body of the sweater will be knit).
13. Remove marker from the LH needle if it is still there. K2. Remove marker. Knit up to next marker, which should be the beginning of round marker.
14. All the stitches on your main needles now are your body stitches. Knit in the round until body reaches desired length. You can try on the sweater to test length. Keep in mind that ribbing will add length as well.
15. K1, P1 ribbing until end of the sweater. I did 2 inches.
16. Cast off body.
Sleeves (follow directions below for each sleeve)
- Slide stitches from sleeve onto your needles. Pick up 10 stitches from where you cast on for the underarm.
- Knit in the round until sleeve reaches desired length. You can try on the sweater to test length. Keep in mind that ribbing will add length as well.
- K1, P1 ribbing until end of the sweater. I did 4 inches for the exaggerated ribbing in the photos, but you can do 2 to match collar and hem.
- Cast off sleeve stitches.
And that’s it! Your beginner raglan is finished!
I would love to see your versions, so if you do make this sweater, tag me @joy.2.create on Instagram. I want to see all the colors and stripes!
Happy Knitting!

Leave a comment